TL;DR
- To create a training dataset for object detection, define classes and edge cases in writing before anyone draws a box.
- Split into train, validation and test sets before augmenting, and split by scene, not by frame.
- Most label noise comes from unwritten rules about occlusion, truncation and small objects.
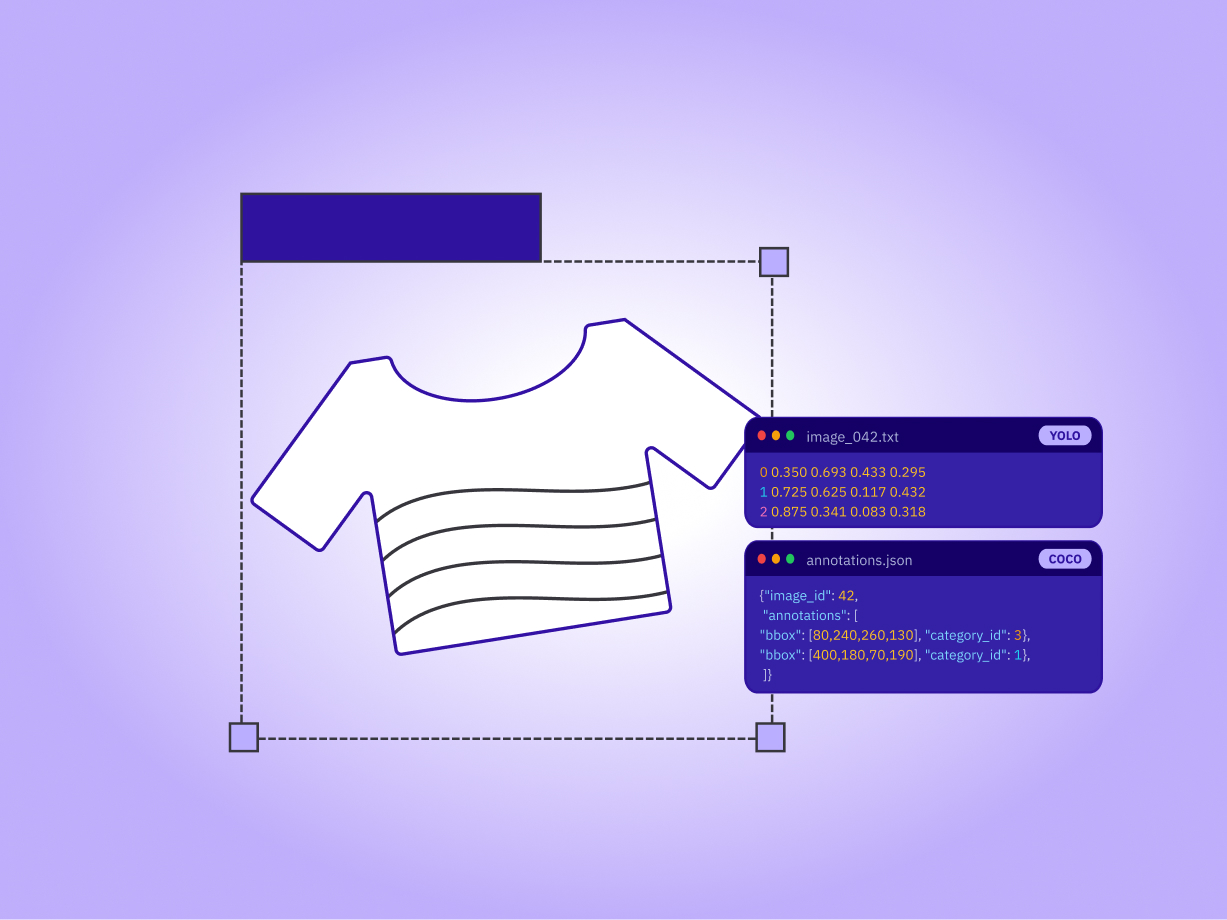
- YOLO and COCO store the same box in different coordinates, and conversion bugs fail silently.
- Review loops, golden tasks and IoU checks catch bad labels before the model learns them.
Most object detection projects do not fail at the model. They fail at the labels. A detector can only learn the rule your annotators actually followed, so if half of them box the visible edge of a partly hidden object and the other half box its estimated full shape, the model learns a blurred version of both.
That makes how to create a training dataset for object detection mostly a rules problem: you write the rules first, collect varied images, label them consistently, export to the right format and check quality before you train. Teams building object detection models in YOLO or anything else hit the same wall, because computer vision training data fails quietly. This guide walks through the six steps, with sample label files and a labeling-rules checklist you can adapt. If you want the model side, our guide to object detection algorithms covers it.
Who this guide is for (and not for)
This guide is for ML engineers, computer vision engineers and data ops leads who are building or fixing a bounding box dataset. It assumes you can train a model and want the data side done properly.
It is not for anyone who needs a ready-made public dataset to benchmark against. COCO and Pascal VOC already exist for that. It also does not cover segmentation or 3D point clouds, which have their own labeling rules.
How do you create a training dataset for object detection?
You can create a training dataset for object detection in six steps: define your classes and edge cases, collect varied images, split them into train, validation and test sets before augmenting, label every object with consistent bounding box rules, export to YOLO or COCO format, then QA the labels and retrain on the failures.
- Plan classes, edge cases and dataset size.
- Collect images and split them.
- Label with written bounding box rules.
- Export to YOLO txt or COCO JSON.
- QA with IoU checks, review loops and golden tasks.
- Train, find failures and relabel.
Let’s dive into these in detail:
Step 1: Plan your training dataset for object detection (classes, edge cases, image count)
Most dataset problems start as class-definition problems. If your spec says "vehicle," someone will have to decide whether a golf cart, a forklift or a trailer counts, and they will decide differently on Tuesday than on Monday. List every class, give each one a one-line definition, and write down the ten ambiguous cases you already know about.
For size, there is no honest single number: It swings with how much the objects vary, how many classes you have and whether you start from pretrained weights. The figures that circulate online, often 1,500 images or more per class, are rules of thumb from tutorials and forum threads, not controlled studies for your domain.
Measure instead: Label a pilot of a few hundred images per class, train on 25%, 50% and 100% of it, and plot validation mAP against dataset size. If the curve is still climbing, add data. If it has flattened and the errors cluster on a few classes, more images will not help, and your spec or class balance is the problem. Count boxes per class, not just images, because one crowded image can hold dozens.
Include background images with no target objects as well. A model that never sees an empty shelf will find objects in it. Class balance matters as much as total count: a dataset with 5,000 cars and 80 cyclists teaches the model that cyclists are rare, and it will behave accordingly.
Pro tip: Add a background set and a hard-negative set on purpose. Shelves, shadows and reflections that look like your target class are what produce false positives in production, so photograph them deliberately.
Step 2: Collect images, diversity and the train/val/test split
Your images need to look like the deployment environment, not like your lab. Vary time of day, season, weather, lighting, camera angles and camera sources. If your detector will run on a warehouse camera at 3 a.m., a dataset shot at noon will not prepare it.
Sources usually fall into three buckets: footage you capture yourself, data from a customer's cameras, and public or licensed images. Check licenses before you scrape. Synthetic images can fill rare cases, but keep them out of your validation and test sets so those sets measure how the model behaves on real data.
The split is where teams leak data without noticing. Frames from the same video or scene are near-duplicates, so if one lands in train and its twin lands in validation, your metrics look great and your model has memorized the room. Split by scene, session or video, not by individual image, and keep class proportions similar across splits. A common starting point is 70/20/10 or 80/10/10. Validation and test images must never appear in training.
Augment only after splitting, and only the training set. For a wider view of the computer vision data pipeline, start there.
Step 3: Label with bounding box rules for occlusion, truncation and small objects
Labeling is where the spec meets the annotator, and every unwritten rule becomes noise. The baseline is simple: boxes closely enclose each object with no gap, and every instance of every class in every image gets labeled, because a missed object teaches the model that it is background. Everything below is how you get a team to do that consistently.
Labeling-rules checklist
- Tight boxes: The box touches the object's outermost pixels on all four sides. No padding.
- Occlusion: Pick one convention and write it down: box the visible part only, or box the estimated full extent. Visible-only is simpler to label consistently. Add an "occluded" attribute so you can filter later.
- Truncation: When an object runs off the image edge, box it to the edge and tag it truncated. Pascal VOC has a native truncated flag for exactly this.
- Small objects: Set a minimum size in pixels, based on your training resolution, and say what happens below it: label it, tag it "too small," or skip it. Mixing the three is the most common source of inconsistent small-object labels.
- Groups and crowds: Decide whether a dense crowd gets one group box or individual boxes. COCO uses an iscrowd flag for groups.
- Ambiguous cases. Give annotators a place to ask. A question answered once in the spec is cheaper than 200 inconsistent boxes.
The same bounding box annotation rules apply whether you label in-house or with a vendor, so write them for a stranger to follow.
Tooling changes the cost too. Papadopoulos et al. found that drawing a high-quality box took about 35 seconds on ILSVRC, while their extreme-clicking method (click the top, bottom, left and right extremes) took about 7 seconds per box with comparable box quality (ICCV 2017). The lesson for your pipeline: how annotators place boxes affects cost as much as how many you buy.
Want to see QC and golden tasks on your own images?
Send the Taskmonk team a sample batch and they will show you the review set-up and accuracy reports on it.

Step 6: Train, find failures, relabel (active learning loop)
Your first training run is a diagnostic, not a result. Train with default settings first, then read the confusion matrix and the precision-recall curve to see where the model fails. Sort each failure into one of three buckets: a label error, a spec gap, or a data gap.
Label errors go back to the review queue. Spec gaps mean you update the rules and relabel the affected images, which is why the spec lives in a versioned document. Data gaps mean you collect more of the missing condition, such as night shots or small objects.
Then close the loop. Use the current model to pre-label the next batch, and have annotators correct boxes instead of drawing them from scratch. Correcting a decent pre-label is faster than labeling cold, and each round improves the next round's starting point. Stop collecting when new data no longer moves your validation metric and the remaining errors cluster on a few confusing classes, because that is a spec problem, not a volume problem.
How Taskmonk handles object detection dataset creation
Most teams discover the same thing around the second labeling round: the hard part is not drawing boxes, it is keeping hundreds of thousands of them consistent. Taskmonk is built for that layer, the annotated training data a detector learns from. It runs on three parts working together: AI pre-labeling, platform-powered workflows and qualified human experts.
AI pre-labeling: A YOLO-based object detection model (v12) runs when tasks are created, so annotators start from model-drawn boxes and correct them instead of drawing from scratch. Outputs are confidence-scored, which sends human review to the boxes where the model is unsure. You can swap the detection model per task without rebuilding your pipeline, and you can load your own annotations or custom pre-labels.
Workflows: Review is configurable per project: Maker-Checker, Maker-Editor, or Majority Vote with a consensus percentage you set. A DynamicPercentageRule routes work to QC based on each annotator’s rolling accuracy over the past month, so new or error-prone annotators get more review and proven ones get less. Tasks go out by affinity, not a flat queue, so each one lands with the people calibrated for that data.
Qualified human experts: Annotators are assessed, trained and certified per task type before they touch your data, then monitored against live accuracy metrics, with a path to move up into harder edge cases. When someone hits an ambiguous object, a Clarifier role answers mid-task instead of leaving them to guess.
Measured quality and export: Set a Golden Task percentage, import a golden batch, and get golden accuracy in your reports, alongside IoU, precision, recall and missed and extra box counts. Export outputs as YOLO, COCO, or Pascal VOC, and in Gallery View you can regenerate it in another format without relabeling.
Taskmonk is trusted by 10+ Fortune 500 teams to run 800M+ labeling tasks, and holds a 4.6 out of 5 rating on G2. It works at the labeling layer: it produces and quality-checks the dataset, and you still train the model in your own stack. If you want to run your raw images through it before committing, talk to the Taskmonk team about a pilot on your own data.
Conclusion
A bad dataset costs more than the labeling bill. It costs the weeks spent tuning a model that was learning from contradictory boxes, and that cost never shows up as a line item.
Teams that get this right do the boring things early. They write the spec before the first batch, split by scene, pre-label with the current model, and review a sample of every batch instead of the first one.
Pick your most ambiguous class and write its rule in one sentence today. If you cannot, your annotators cannot either.
Frequently asked questions
How many images do I need to train an object detection model?
It depends on how much the objects vary, how many classes you have and whether you start from pretrained weights, so any fixed number is a rule of thumb. Label a pilot of a few hundred images per class, train on 25%, 50% and 100% of it, and check whether validation mAP is still climbing. Count boxes per class too, since one crowded image can hold dozens.
Should I use YOLO or COCO format?
Use whichever your training code reads natively, and generate the other from it. YOLO txt is lighter and suits YOLO training pipelines. COCO JSON carries more metadata and is the standard for evaluation tooling.
How should I split my dataset into train, validation and test sets?
Split by scene, session or video, not by image, so near-duplicates stay together. A 70/20/10 or 80/10/10 split is a common start. Keep class proportions similar and never let validation or test images appear in training.
How do I label occluded or partly hidden objects?
Pick one rule and apply it everywhere: box the visible part, or box the estimated full extent. Visible-only is easier to keep consistent. Add an occluded tag so you can filter or weight those boxes later.
How do I check the quality of my bounding box labels?
Measure IoU between annotator boxes and a trusted reference, and track missed and extra boxes separately. Use a second-pass review for a sample of every batch, and seed golden tasks to score annotators continuously.
Can I use a pretrained model to label my dataset automatically?
Yes, as a starting point. Pre-labels from a YOLO model let annotators correct boxes instead of drawing them, which is faster. Keep humans in the loop for review, because a model that mislabels one class will mislabel it consistently