Multimodal Audio Annotation: A Complete Guide for AI Training
TL;DR
Audio annotation is the process of labeling raw audio so machine learning models can learn speech, sound events, emotions, and speaker patterns. It becomes even more critical in multimodal AI, where audio must align with video, text, or metadata.
Poor annotation quality is one of the main reasons speech and voice AI models fail in real-world environments, even when they perform well in testing.
The five core techniques used in most audio annotation programs are:
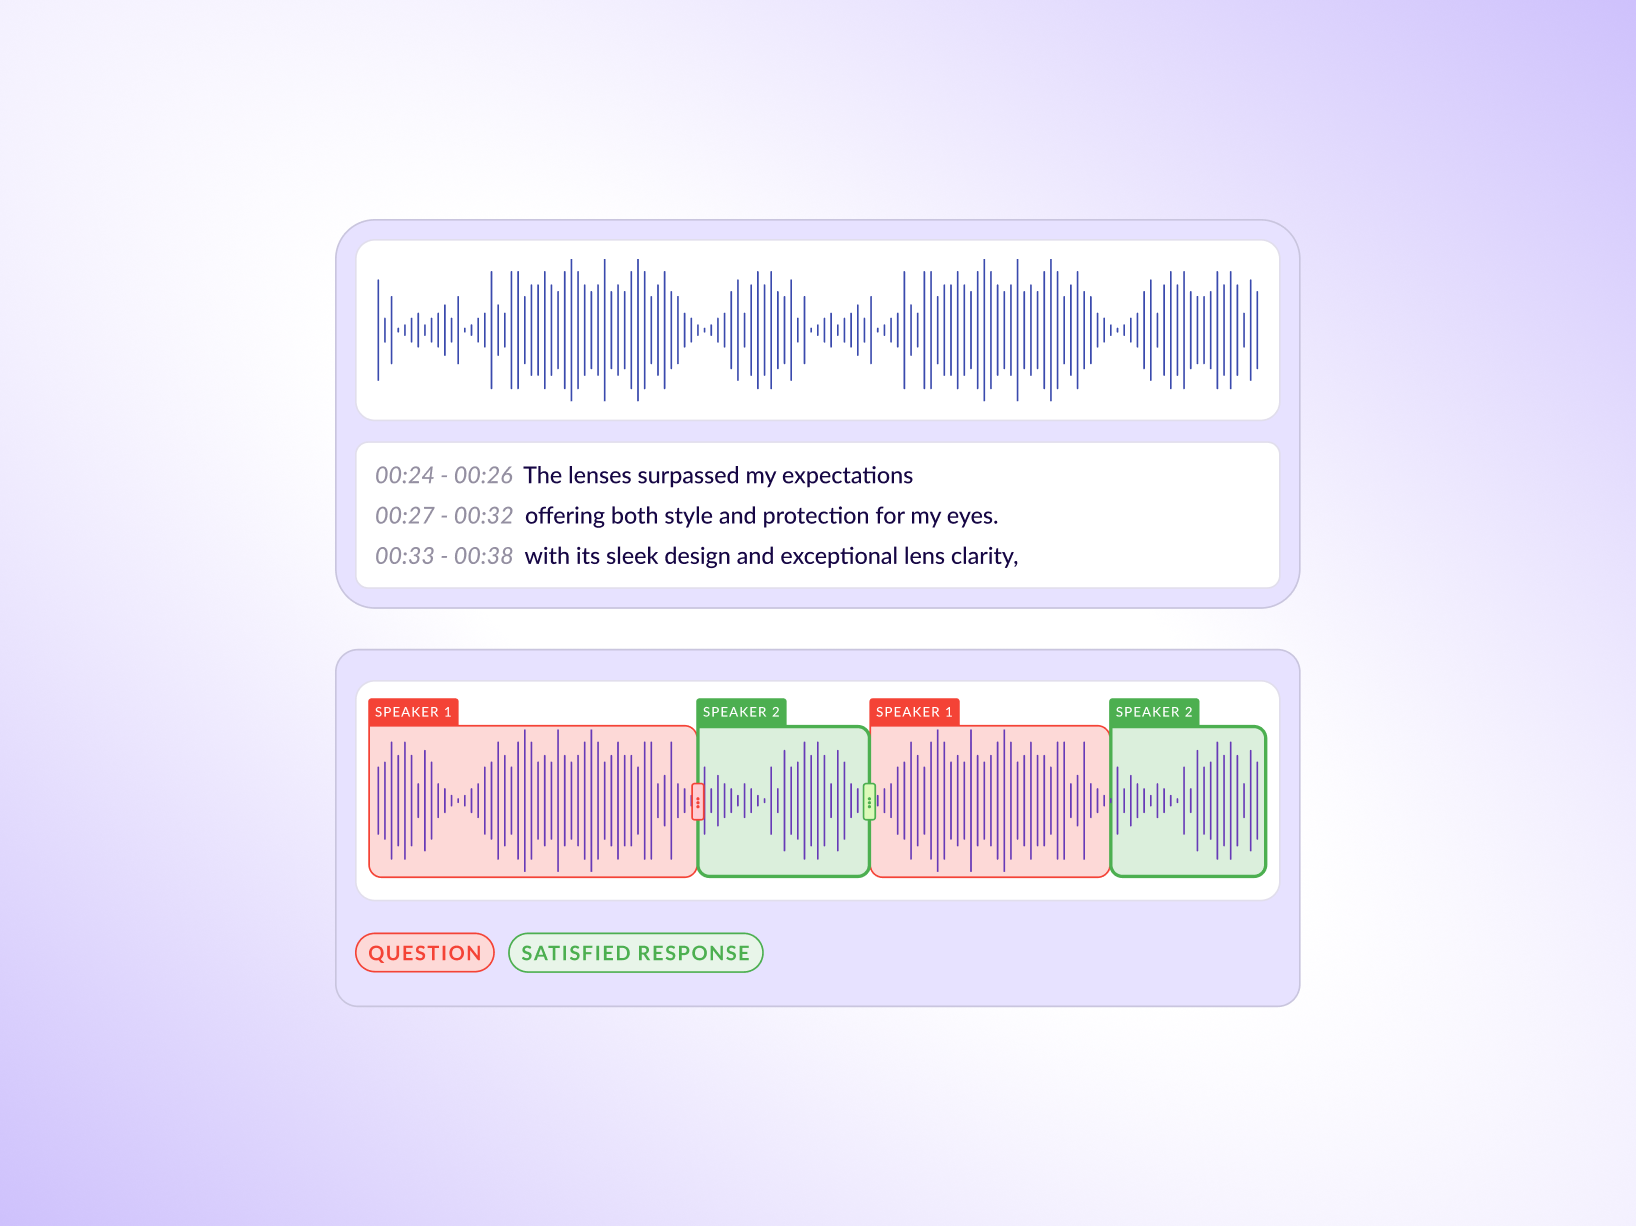
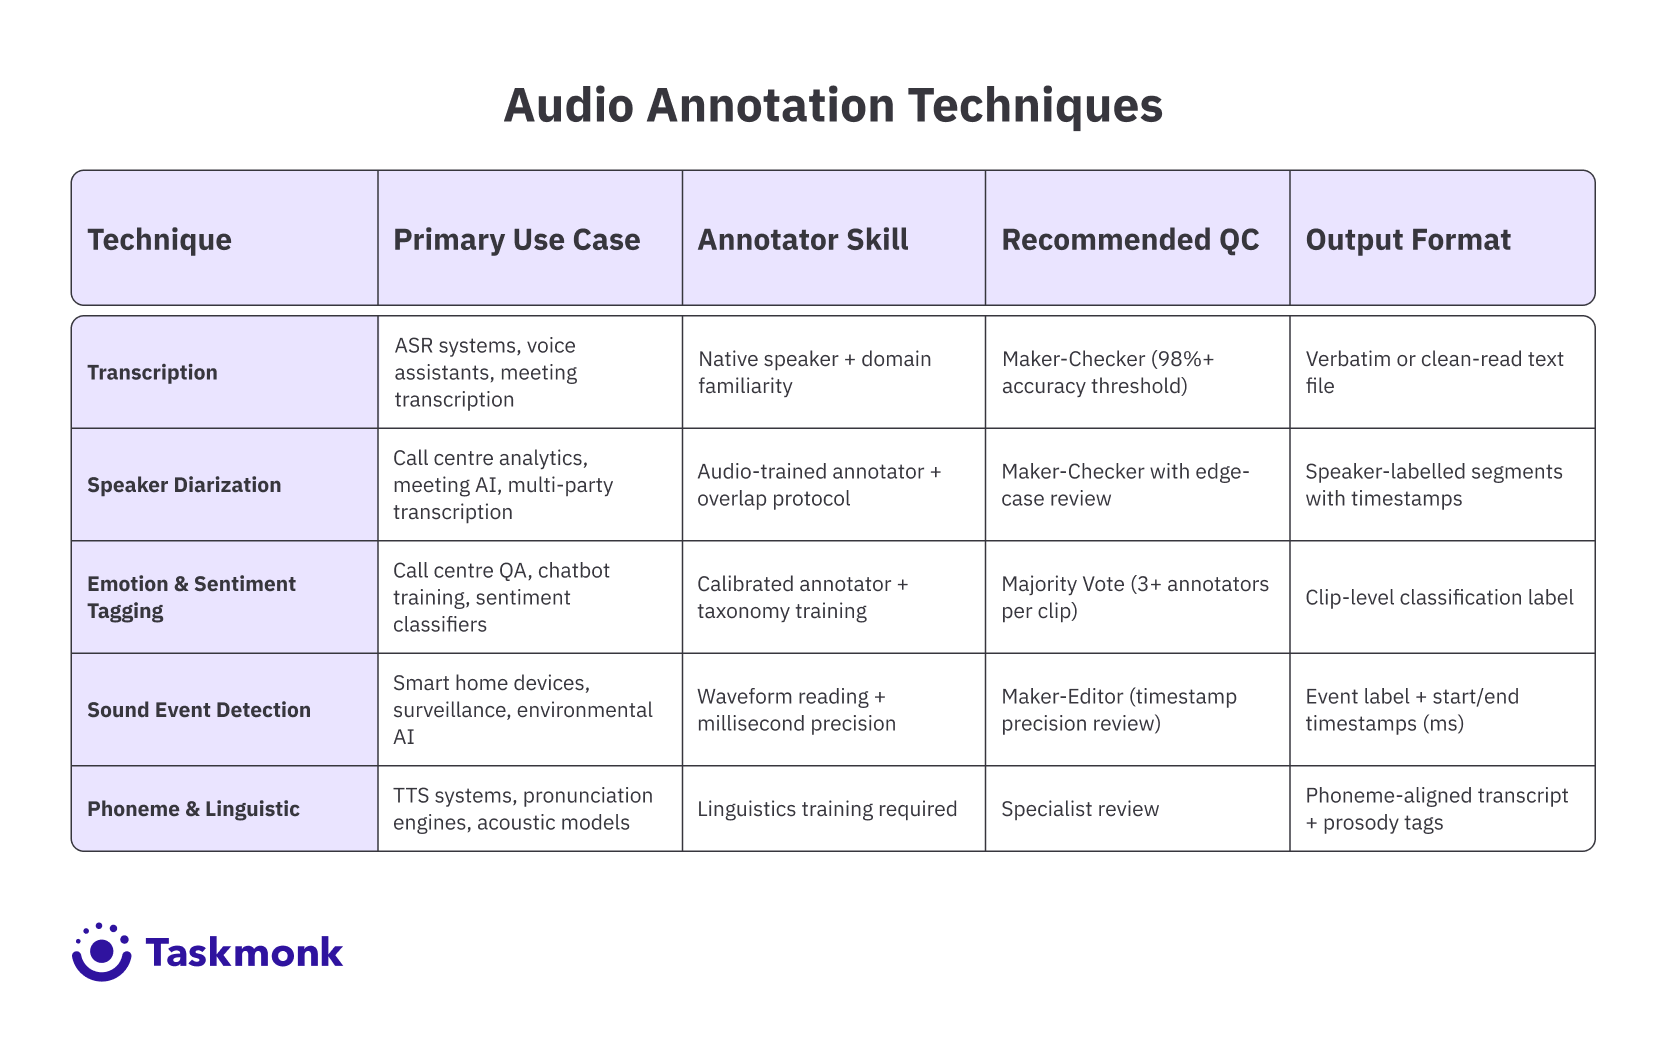
- Transcription – converting speech to text
- Speaker diarization – identifying who spoke and when
- Emotion/sentiment tagging – labeling tone or intent
- Sound event detection – marking real-world sounds with timestamps
- Phoneme / linguistic annotation – fine-grained speech labeling for TTS and ASR
High-quality datasets require clear annotation specs, domain-matched annotators, inline QC, and smart use of pre-labeling, not just large volumes of data.
Multimodal speech models demand tighter coordination across modalities, making annotation workflows, quality control, and tooling just as important as model architecture.
Platforms built for production workflows like Taskmonk help teams scale audio annotation with affinity-based routing, multi-level QC, pre-labeling, and multimodal support, enabling reliable training data for real-world AI systems.
Introduction
This guide explains how to choose the right annotation techniques, avoid common data quality mistakes, and build audio datasets that actually improve model performance.Picture this: your speech model ships after months of training. It handles clean studio audio reasonably well. Then someone tries it in a real meeting room, with overlapping speakers, a noisy HVAC system, and two participants calling in from different time zones. The model drastically falls apart.
The culprit isn't the model architecture. It's the audio annotation that fed it. If the training data didn't capture real-world acoustic conditions, speaker transitions, background noise events, and emotional tone, the model was never going to handle them. Audio annotation is where the gap between lab performance and deployment performance of speech AI models gets decided.
The challenge is that audio is one of the harder modalities to annotate well. Unlike images, where a label either covers the right region or it doesn't, audio unfolds across time and layers. Getting it right requires the correct techniques, applied consistently, with quality checks that account for the unique complexity of sound.
Understanding how AI-powered data labeling platforms streamline annotation workflows is a good starting point and if audio is part of a broader training pipeline, it's also worth seeing how multimodal annotation tools handle audio alongside video, text, and image data.
This guide covers what audio annotation is, why it matters for machine learning, the five main techniques your team needs to know, and what separates annotation programs that actually produce useful training data from those that just produce volume. Let's get into it.
What is Audio Annotation?
Audio annotation is the process of labeling raw audio data so a machine learning model can learn from it. At its most basic, that means a human annotator listens to a clip, applies one or more labels, and that labeled clip becomes part of a larger training dataset. The model trains on thousands or millions of these labeled clips, learning to recognize patterns it can then apply to new, unlabeled audio.
The labels vary significantly by use case. For an automatic speech recognition (ASR) system, the label might be a verbatim transcript of what was spoken. For an emotion detection model, the label might be a tag like 'frustration' or 'neutral.' For a sound event detection system, the label could be 'dog barking' or 'glass breaking,' time-stamped to the exact millisecond when the sound starts and ends.
Multimodal audio annotation goes a step further. It connects audio labels to other data types, usually video frames, text, or metadata, so that models can learn cross-modal relationships via the multimodal training data it is fed.
A sentiment analysis model trained on call center data, for example, needs audio emotion labels that align with transcript labels and, sometimes, with visual cues from video. When the audio says one thing, and the transcript implies another, the annotation has to capture both signals so the model can learn to reconcile them.
What makes audio annotation different from image or text annotation is the temporal dimension. Labels in audio need to be placed at the right point in time, maintained for the right duration, and coordinated with other labels that may overlap.
A clip with two simultaneous speakers, background music, and an ambient sound event requires multiple annotation layers running in parallel. That coordination is what audio data labeling programs often underestimate until the first batch of training data comes back wrong.
Why Annotating Audio Data Is Essential for Machine Learning
Every voice-enabled AI product in production, from virtual assistants to medical transcription tools to call centre automation, runs on labeled audio data. There's no shortcut around it. The model learns what it was shown, and it performs exactly as well as the quality of those examples allows.
The stakes are clearest in high-accuracy domains. An ASR model deployed in a healthcare setting needs to transcribe clinical terminology correctly, distinguish between similar-sounding drug names, and handle the kinds of acoustic conditions that exist in actual hospital environments, not just clean recordings. If the annotation program didn't include diverse audio clips labeled by annotators with medical domain knowledge, the model won't have learned what it needed to.
Beyond accuracy, audio annotation drives robustness. Models that train only on clean, high-quality recordings will struggle with accented speech, non-native speakers, telephony compression, or background noise. Intentionally including diverse audio conditions in the training data, all correctly labeled, is how teams build models that hold up outside the test set.
Audio annotation also enables capabilities that would be impossible without it. Speaker diarization requires labeled examples of multi-speaker audio. Emotion detection requires labeled examples that correlate acoustic features with human-interpreted emotional states. Sound event detection requires labeled examples of the exact sounds a model needs to recognize. None of these can be bootstrapped from unlabeled data alone. For teams thinking about where audio fits in a broader training data strategy, the complete data labeling guide covers how audio workflows connect to the wider AI data pipeline.
Pro tip: Breadth matters as much as depth in audio training data. A model trained on 10,000 clips from a single recording environment will underperform a model trained on 5,000 clips spanning five environments. Prioritize acoustic diversity before chasing volume.
Understanding the Five Main Types of Audio Annotation Techniques
Most audio annotation programs use a mix of these five techniques, chosen based on what the model needs to learn. Each has distinct requirements, common failure modes, and downstream impact on model performance.
The table below demonstrates the Audio annotation techniques.
Best Practices and Recommendations for Multimodal Speech Models
The difference between an audio annotation program that produces good training data and one that produces expensive noise usually comes down to a few operational decisions made early. Here are some practices that our experts at Taskmonk recommend:
- Write the annotation spec before you recruit annotators: The spec defines every label in the taxonomy, how to handle edge cases, what accuracy thresholds apply, and how disagreements between annotators get resolved. Annotators who start work without a clear spec default to their own judgment, which means they make different decisions on the same types of clips. That inconsistency poisons the training data before QC can catch it.
- Match annotators to the audiotype: A general-purpose annotator without medical domain knowledge should not be transcribing clinical recordings. An annotator who doesn't speak the target language natively should not be doing emotion tagging in that language. Acoustic dialect matters too: annotators who grew up with a specific dialect of English hear regional accents differently from annotators who didn't. Affinity-based annotator matching, where you route clips to annotators based on their linguistic background, domain expertise, and prior performance on similar clips, produces better labels than random assignment.
- Build QC into the workflow, not onto it: QC that runs after annotation is complete catches errors after they've been locked in. QC that runs inline catches systematic errors early. For a deeper look at how to structure these checks, Taskmonk's guide on data labeling quality frameworks covers gold sets, IAA tracking, and sampling strategies that apply directly to audio programs.
- Use pre-labelling where it makes sense: Automated tools can generate an initial transcript or a set of candidate labels for each clip, which human annotators then review and correct rather than starting from scratch. This typically reduces annotation time by 30-50% on high-volume transcription tasks.
%20audio%20annotation%20.png)
Pro tip: Set your QC sample rate based on annotator tenure, not a fixed percentage. A new annotator should have 30-40% of their output reviewed. An experienced annotator with a track record of high accuracy can be sampled at 5-10%. This allocation makes QC effort proportional to risk.
Why Taskmonk Stands Out for Audio Annotation
Most annotation platforms treat audio as one modality among many: a file type they technically support, with generic tooling and a QC workflow that wasn't designed for the specific challenges of speech.
That works fine for simple transcription on clean studio audio. It stops working when your pipeline needs speaker diarization aligned with transcription timestamps, emotion tags verified through majority vote, or a speech analytics dataset that exports segment-level intents, sentiment labels, and redacted sensitive content in a single pass.
Here are some features that make Taskmonk robust for even complex annotation workflows:
- ASR-Powered Pre-Labeling for Audio: Taskmonk's model-assisted labeling uses ASR models to generate initial transcripts before human annotators begin reviewing. That means annotators are correcting, not transcribing from scratch, which cuts per-clip time significantly on high-volume projects. You can plug in your own models or use Taskmonk's, and the platform's Taskmonk experts verify and sign off labels before they enter the training pipeline.
- Affinity-Based Routing at Scale: Taskmonk's built-to-scale allocation system routes audio clips based on annotator language proficiency, dialect background, and domain expertise. A clinical audio project routes to annotators with healthcare familiarity. A multilingual call center dataset routes by native language. This isn't manual configuration: the platform handles matching automatically, which matters when you're running thousands of clips a day across multiple audio types.
- Three QC Execution levels in One Platform: Maker-Checker, Maker-Editor, and Majority Vote are all available natively. For emotion tagging, Majority Vote across three annotators is the right call. For transcription, Maker-Checker with defined accuracy thresholds works well. Having all three in the same platform means teams aren't rebuilding QC workflows as their annotation program scales or as data types change.
- Multimodal by Design, Not Retrofit. Taskmonk lets teams curate and label audio alongside image, video, text, DICOM, PDFs, and sensor data in a single platform. For speech analytics specifically, that means you can transcribe audio, split speakers, timestamp phrases, label intents and sentiment, and flag content for redaction all within one workflow, then export segment-level datasets ready for classifier training. Dataset versioning, validation and test splits, and lineage tracking are built in so training sets are reproducible.
- Enterprise Security Without Setup Overhead. Taskmonk is SOC 2 and ISO 27001 certified. SSO/SAML, RBAC, encryption in transit and at rest, audit logs, and VPC deployment options are all available by default. For teams working with clinical audio, legal recordings, or any data with compliance requirements, that's not a feature request, it's a baseline requirement that most annotation platforms treat as an enterprise add-on.
It is no wonder then that Taskmonk has processed over 480 million tasks across 6 million labeling hours, supported by 24,000+ annotators and trusted by global enterprise clients including Flipkart, LG, Myntra, and CRED. The platform holds a 4.6 out of 5 rating on G2 and has saved clients over $10M in annotation costs.
If you want to see how it handles your specific audio data, book a demo with the Taskmonk team. They'll walk through your use case and show you output quality on your own clips before you commit to anything.
Conclusion
The teams that build voice AI that actually works in production aren't doing fundamentally different things from the teams that don't. They're doing the same things with more discipline: tighter annotation specs, annotators matched to the audio type, QC that runs during production rather than after it, and pre-labeling calibrated to their domain. The compounding effect of those decisions over thousands of clips is what separates a model that performs on the test set from one that performs on the customer's data.
The audio annotation techniques in this guide, transcription, speaker diarization, emotion tagging, sound event detection, and phoneme annotation, each solve a specific modeling problem. The goal isn't to use all five on every project. It's to know which technique your model needs, apply it with the right annotators and quality controls, and verify the output before it enters the training pipeline.
Multimodal AI will only demand more from annotation programs, not less. Models that connect audio to video frames, to text, and to structured metadata require annotation that is consistent across modalities. Getting that coordination right starts with the decisions you make about your annotation program today.
.png)