.png)
Introduction
Image annotation is the most important step in training AI-based computer vision models.
Labeling turns raw images into structured signals your pipeline can learn from and sets the ceiling on accuracy, safety, and explainability.
These structured signals in the form of training data goes into computer vision models to perform specific tasks like identifying products and its details in an e-commerce catalog.
When computer vision systems underperform, the root cause is usually the labels, not the volume of data.
Image annotation tools also play their pary, a right image annotation tool, export formats, and review workflow, teams ship vision models that hold up in real-world conditions rather than just demos.
In this guide, we will explore image annotation and its usefulness, common types of image annotation, image labeling tools, and industry use cases.
What Is Image Annotation in Computer Vision?
Image annotation means adding labels to pictures using different shapes so that computers can recognize what is shown. The goal is to help computers know what is in a picture, where it appears, and what it means for learning and testing.
.png)
Image annotation works at different granularities using the same class names throughout.
At the image level, add presence tags like car, person, and traffic light.
At the object level, localize each car, person, or traffic light with bounding boxes, polygons, or keypoints and attach attributes such as color, brand, state(e.g., traffic light = red/amber/green), or occlusion.
At the pixel level, create segmentation masks for the same classes: semantic labels pixels by class, instance separates each object, and panoptic combines both for precise boundaries.
These labels become ground truth for computer vision models and are exported in standard formats like COCO, Pascal VOC, or YOLO so training reads them reliably.
In production workflows, image annotation involves more than just drawing shapes.
It starts with a clear ontology and guidelines, continues with consistent labeling in an annotation tool, and ends with review and quality assurance. Teams track agreement between annotators, enforce thresholds like IoU, precision, recall, and mAP, and version both images and labels so changes are auditable.
How Is Image Annotation Useful for Vision Models?
Image annotation transforms raw images into data that trains vision models for consistent tasks. Different labels enable various functions: bounding boxes for detection, pixel-wise segmentation for background removal and measurement, and classification for enriching catalogs.
Here is an e-commerce example, from catalog intake to search
- Product localization: Draw bounding boxes or polygons around each SKU in lifestyle and studio shots to separate the model from the background and clutter.
- Attribute enrichment: Add labels for category, brand, color, pattern, fabric, sleeve length, neckline, and logo so the system autofills PDP attributes and minimizes manual entry.
- Visual search and recommendations: Use these labels to train retrieval and similarity models that power “search by image,” find near-identical SKUs, and group alternatives by style or price.
- De-duplication and quality control: Compare embeddings to flag duplicate or near-duplicate listings, detect mismatches between image and title, and catch low-quality or non-compliant images.
- Content moderation and compliance: Classify restricted content or IP-sensitive logos, then route exceptions to reviewers for final labeling and audit.
The same image annotation blueprint powers other computer vision use cases. ADAS, medical imaging, manufacturing, and more.
After these workflows are in place and your first model is live, active learning strengthens results.
The system then ranks uncertain or novel images, such as occluded products, new seasonal variants, or hard negatives like black-on-black textures, and sends only the most informative samples to annotators.
With the right annotation tool, pre-labels accelerate throughput without sacrificing accuracy, while review queues and consensus keep labels consistent.
Operational KPIs that tie image annotation to business results:
- Quality: How well the labels match the objects and how accurate the model is when predicting results.
- Speed and cost: How fast each image is labeled, how many labels an hour, and the cost per label after review.
- Coverage: How much of the catalog is fully labeled, how many duplicates are found, and how often the first search result is clicked.
Image Annotation Process
Turn raw image data into annotated data that your training loop can trust. Use these five steps, each with clear outputs and measurable acceptance criteria.
- Define ontology and guidelines
First, define your ontology and annotation guidelines. List classes, attributes, and relationships that the model must learn. Map shapes to tasks: bounding boxes for detection, polygons for irregular outlines, keypoints for landmarks, polylines for linear features. Add positive and negative examples, occlusion and truncation rules, and target thresholds such as IoU and attribute accuracy. - Set up the tool and data
Next, set up the annotation tool and source data. Configure roles, hotkeys, review queues, and label colors. Connect storage, pick export formats such as COCO, Pascal VOC, or YOLO, and create train, validation, and test splits. Version both images and labels so every change is auditable. - Label at scale
Once tools are set, label at scale. Begin with calibration on gold tasks. Use model-assisted pre-labels for easy cases to improve throughput without hurting quality. Batch work to balance rare classes and surface edge cases. Track labels per hour, first pass accuracy, and rework rate. - Review, QA, and data quality
After labeling, review and run QA. Route work through reviewer queues. Use consensus where risk is high. Run automated checks for overlap errors, wrong classes, missing attributes, broken masks, or invalid geometries. Define data labeling quality gates (IoU, precision/recall, mAP, escape rate) and promote only batches that pass. - Package for training and iterate
Finally, package the training data and iterate. Validate schema, coordinates, class IDs, and mask integrity before export. Freeze a label version. Produce a manifest the training pipeline can read. Close the loop with error analysis and active learning to update labeling cycles and guidelines for new edge cases.
Implement the process in Taskmonk with this step-by-step UI guide covering setup, shapes, QA, and exports: Working with the Image-Annotation UI →
Types of Image Annotation
Different image annotation types and tools for computer vision and tasks for image labeling call for different shapes. Bounding boxes give fast localization, polygons capture irregular boundaries, polylines map linear structures, and key points mark precise landmarks.
The right choice balances model objective, evaluation metric, and labeling cost.
There are four most commonly used types of image annotations: bounding boxes, polygons, polylines, and key points. Here we will cover each of them in more detail:
Bounding box
Bounding boxes are rectangles drawn around each object instance for scalable localization. Use bounding boxes when approximate boundaries are acceptable and you need reliable object counts or tracking.
Drawing a bounding box around an object in an image like a cat or a toy, is one of the ways to annotate and label objects.
The purpose of a bounding box is to define the spatial extent of the object and to provide a visual reference for machine learning models that are trained to recognize and detect objects in images.
Specify annotation rules like background margin no more than three pixels; minimum box size sixteen by sixteen pixels; accessory inclusion defined by class.
Define how to handle truncation, occlusion, shadows, and reflections.
Require square boxes only if a downstream model expects them. Export guidelines: COCO stores x, y, width, height in pixels; YOLO expects normalized center x, center y, width, height; Pascal VOC uses two corner points.
Quality checks include Intersection over Union per class, small-object error rate, and reviewer agreement on box tightness.
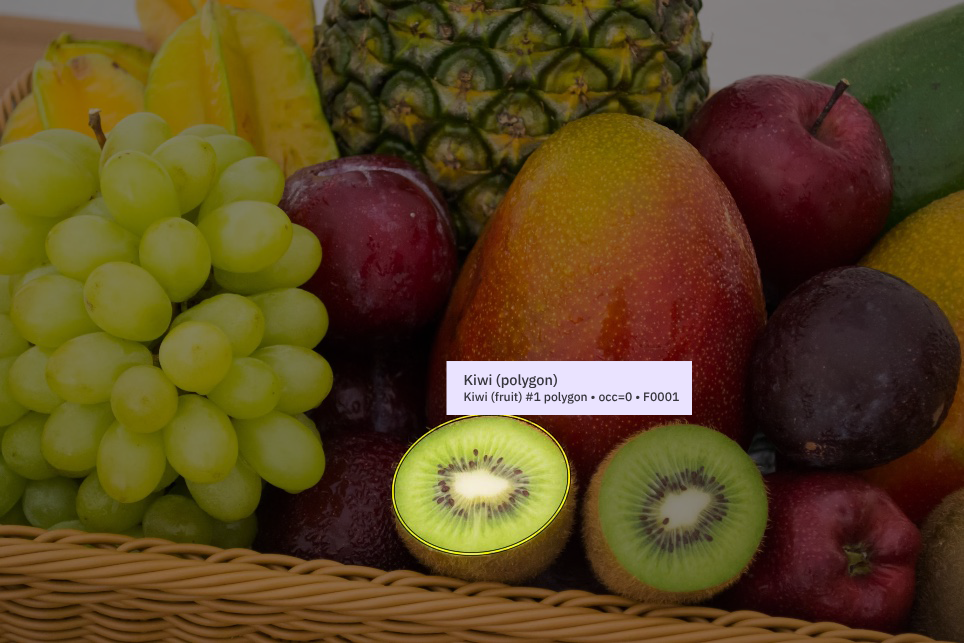
Polygon
Polygons are freeform vectors that trace object outlines, where boundary accuracy is important for model performance.
Use polygons for tasks like e-commerce cutouts, regions of interest in medical AI, wildlife silhouettes, and manufacturing defects.
Set annotation rules: keep vertex spacing consistent at about four to eight pixels on 1,000-2,000 pixel-wide images; add points at corners or curvature changes only. Prohibit self-intersections and define how to handle internal holes and overlaps. Set rules for adjacent object boundaries to avoid gaps or double coverage.
Prefer polygons when box background leakage hurts training or when masks are required for downstream editing.
Quality checks include boundary IoU or Dice score, mask topology validation, and vertex count distributions aligned with guidelines.
Polyline
Polylines are centerlines used for annotating linear structures when alignment outweighs area considerations. Use polylines for lane markings, rails, cracks, seams, cables, and text baselines.
Annotation guidelines: document start/end points, snapping behavior, and whether parallel lines are one or two features. Set sampling step size (e.g., five to ten pixels per point) and maximum bridgeable occlusion gap.
Define annotation for intersections and merges to ensure review consistency.
Represent lines as ordered point lists or line strings, with coordinate precision matching image resolution. Quality checks include average perpendicular distance to reference lines, continuity and gap rates, and topology error tracking at junctions.
Keypoints
Keypoints are landmarks placed on defined parts such as facial features, joints, apparel fit points, or component corners.
Use keypoints when precise part location is important to the task. Annotation rules: specify strict index order, left/right naming, and three-state visibility (visible, occluded, not present).
If using a skeleton, define the edge list and units to preserve bone lengths and angles in augmentations. Calibrate annotators for scale changes and extreme viewpoints before production.
Quality checks include the percentage of correctly identified keypoints within a defined pixel tolerance (e.g., PCK at 5 pixels), scale-aware metrics such as OKS, per-point visibility accuracy, and swap error rates on symmetric parts.
.png)
Image segmentation
Image segmentation tools (Semantic, Instance, Panoptic) creates Pixel-wise masks for classes or instances when boundary precision drives model quality. Use semantic segmentation when only region class matters, instance segmentation when counting and separation are required, and panoptic segmentation when you need a unified output.
Write rules for class adjacency, overlaps, holes, and thin structures like straps or wires. Calibrate annotators on zoom levels and anti-aliasing artifacts to avoid ragged edges.
Validate with mean IoU or Dice for semantic tasks, per-instance mask IoU for instance tasks, and panoptic quality for unified outputs.
Use Cases of Image Annotation: ADAS, Medical Imaging, E-commerce, Manufacturing
Increase model reliability with task-specific shapes, QA metrics, and workflows tailored to real production constrain
What Should an Image Annotation Tool Be Capable Of?
When you pick an image annotation tool, it should handle any image annotation use cases, support image- or frame-level and object classifications, and include automation that actually saves time.
Look for built-in review workflows, consensus, lineage, and versioned exports so quality and reproducibility hold at scale.
Core must-haves
- Flexible labeling: boxes, polygons, polylines, keypoints, pixel masks; per-object attributes and image/frame classifications.
- Workflow & QA: review queues, consensus/double-blind, gold tasks, AutoQA rules (overlaps, holes, missing attrs), versioned exports.
- APIs & data: Python/REST SDK, webhooks, COCO/VOC/YOLO + custom schemas, S3/GCS/Azure connectors, dataset/version management.
- RBAC & lineage: roles, SSO/SAML, audit trail of who changed what, when.
Automation that matters
- Pre-labels/auto-seg: with measurable correction overhead.
- Active learning hooks: to surface uncertain/novel samples.
- Operator ergonomics: hotkeys, snapping, latency budgets, templated ontologies.
Security & compliance (non-negotiable)
- Access & privacy: least-privilege RBAC, MFA, region residency, PII/PHI redaction.
- Protection & ops: encryption in transit/at rest, backups, DR, status/incident reporting.
Buyer’s Checklist: Popular Image Annotation Tools

Image Annotation with Taskmonk: A User-Friendly, Capable Image Labeling Tool
Once guidelines for an image annotation project are ready, you need a powerful and user-friendly tool that lets annotators apply accurate labels quickly and consistently.
Taskmonk’s streamlined UI, hotkeys, and model-assisted pre-labels cut manual effort and reduce errors; AutoQA and review queues create enforceable data quality gates before anything reaches your training loop.
The result is simpler, faster, and more cost-effective annotation—so teams label fewer images by hand, make fewer mistakes, and deliver production-ready datasets.
Taskmonk brings together the features and best practices project leads need to run robust image annotation at scale.
Platform and managed services
- Platform: Taskmonk provides a fast, governed image workspace: define ontology (classes, attributes, per-class shapes) and label with boxes, polygons, polylines, keypoints, and pixel masks using hotkeys and copy-forward.
Model-assisted pre-labels speed easy cases while AutoQA flags overlaps, off-image coords, mask holes, and missing attributes; review workflows support consensus/adjudication with full lineage. - Managed services: A trained and vetted workforce, project management, custom taxonomies guideline creation, calibration runs, and multi-level QA. Leverage a capable image annotation platform with expert labeling services with Taskmonk.
24–48 Hour POC: Data Flow & Deliverables
This is a fast, low-risk pilot to prove that our image annotation workflow, image annotation tool, and operators fit your computer vision stack.
In 1–2 days we validate quality (IoU/mAP/Dice), throughput, exports (COCO/VOC/YOLO), and reproducibility—so you know scaling won’t create surprises.
Data flow: You share read-only S3/GCS/Azure access; we pull image samples. Data is cached temporarily in Taskmonk (encrypted), then deleted or retained per your instruction. We return sample labeled image data and exports.
Day 1 (0–24h): Connect bucket + region → import/define ontology → enable AutoQA + hotkeys → create gold set → calibrate → focused labeling sprint → stand up review queues + consensus.
Day 2 (24–48h): Adjudicate disagreements → finalize subset → generate versioned COCO/YOLO/VOC exports + manifest → share QA metrics; optional quick train on the POC set → confirm retention/deletion.
Deliverables: Sample labeled images; versioned exports (COCO/YOLO/VOC); dataset manifest (lineage + versions); QA snapshot (IoU, precision/recall, mAP, consensus/escape rate); SDK snippet to fully reproduce.
Sample workflow and outputs you receive
- Workflow: upload or stream image data, select or import ontology, label with hotkeys, validate with AutoQA, route to review queues, export with a frozen label version, and trigger training from the SDK.
- Deliverables:
- Versioned exports for COCO JSON, YOLO TXT, and Pascal VOC XML
- A dataset manifest that ties images and labels to a version hash
- A guideline PDF with visual examples and known edge cases
- A QA report with IoU, precision, recall, mAP, consensus rate, and escape rate
CTA:
Head: Run an Image Annotation POC
Subhead: Provide your sample data, we’ll connect your cloud buckets, label sample data, and deliver versioned exports.
CTA: Start your POC
Conclusion
Real-world applications for image annotation span content moderation, e-commerce search and tagging, medical screening, self-driving systems, and security analytics.
Despite the variety of image annotation tasks—classification, detection, segmentation- the purpose is the same: produce high-quality, consistent, and reproducible training image data that teaches vision models to perform reliably in production
Ship production-ready labeled data with a fast, governed workflow with Taskmonk. We connect to your sample data buckets, run a 24 to 48-hour POC, and deliver sample annotations, QA metrics, and versioned exports you can train on immediately.
Ready to take your SaaS product global?
Schedule a demo and ask for a POC with Taskmonk today and experience how our image annotation tool
AI translation, workflow management tools, and integrations can streamline your localization process, enhance your global reach, and ensure your product resonates with users worldwide.
FAQs
- What QA metrics matter for image annotation and model evaluation?
Track intersection over union (IoU) for boxes and masks. Use precision and recall, and mean average precision (mAP) for object detection. Use Dice coefficient for image segmentation. Operationally, watch consensus rate, escape rate, rework rate, and cycle time. These metrics connect annotation quality to production models. - What should an image annotation tool include for production—and how do we validate it in a POC?
Look for review queues, consensus, lineage/audit, role-based access control (RBAC)/single sign-on (SSO), software development kit (SDK)/application programming interface (API), and Common Objects in Context (COCO)/Visual Object Classes (VOC)/You Only Look Once (YOLO) exports with validation. For a 24–48h proof of concept (POC): double-label 100+ images, run adjudication, export in two formats, and reproduce the dataset via API. This will show quality, throughput, and integration for your computer vision workflow. - How does annotated data integrate with our MLOps stack—and how is it secured?
Connect read-only S3/GCS/Azure buckets, pull samples, and use SDK/API + webhooks to push COCO/VOC/YOLO into training. Enforce RBAC/SSO, encrypt in transit/at rest, pin data residency, and maintain lineage so annotated data remains compliant and reproducible end-to-end. - How do model-assisted labeling and active learning speed up image annotation without hurting quality?
Use model-assisted labeling to pre-draw boxes/masks and log correction time vs. from-scratch time—keep it only if net cycle time per image drops and intersection over union (IoU)/mean average precision (mAP) stays flat or improves. Add active learning (uncertainty/novelty sampling + hard-negative mining) so annotators label the most informative image data first. Track rework rate, escape rate, precision/recall, and throughput to prove the gains on your annotated data and vision models. - How do you estimate the cost of professional image annotation?
Pricing follows task complexity: boxes are less than polygons, and polygons are less than image segmentation. Calculate cost per usable label: add label time, review, and rework, and then multiply by the hourly rate. Gate costs by acceptance thresholds, such as IoU/mAP or escape rate. This keeps budgeting aligned with real quality for your deployment. - In-house vs. managed image annotation services—when does a hybrid team make sense for image annotation projects?
Go in-house if you have domain experts, stable volumes, and a tool wired to your MLOps stack. Choose managed services for fast scaling, strict SLAs, and round-the-clock QA. A hybrid model pairs your experts for guidelines, adjudication, and edge cases with a managed workforce for volume. Use RBAC, consensus, and versioned COCO, VOC, or YOLO exports to keep quality and lineage consistent.

.png)
.png)